Tesseract CAD Designing and 3D Printing
by TigerFarmPress in Design > 3D Design
79 Views, 0 Favorites, 0 Comments
Tesseract CAD Designing and 3D Printing


This Instructable guides you through the steps to print a tesseract from sample 3D printable files. Or, follow the steps to modify my designs and then 3D print your own version of a tesseract or a regular cube or a rhombic dodecahedron. Take a step further and develop your own wireframe shaped CAD design using the techniques outlined.
Here are overviews to you get started. Farther below, are steps with details, information, and more links.
Overview steps to print a sample STL file:
- Start by viewing what the 3D shape looks like. Click a link to one of my sample GitHub 3D print print files(see list below) such as the 4mm square prism frame tesseract: 4CubePrism3mm.stl, which is my favorite. In GitHub, zoom in and out and rotate the shape to get a good look.
- Download an STL file.
- Load it into your 3D printer slicing program and prep it to print.
- Print it on your 3D printer.
Overview steps to modify samples:
- Install OpenSCAD. It is an app for displaying and developing CAD designs using its programming language. It's very interactive for quick development.
- Download a sample OpenSCAD file such as the 4mm square prism frame tesseract: 4CubePrism3mm.scad.
- Open the file in OpendSCAD and modify it. This can be as straightforward has changing the parameters to print a larger tesseract.
- Export the CAD design as an STL file and 3D print it.
The STL files and OpenSCAD files are free for you to use.
Supplies
To print a sample tesseract STL you will use your 3D printer's slicing program and the printer.
To modify the sample CAD designs, you will need the software: OpenSCAD. "OpenSCAD is software for creating solid 3D CAD models. It is free software and available for Linux/UNIX, Windows and Mac OS X," from the OpenSCAD website.
Print a Tesseract Sample


To 3D print the tesseract in the photo, download the STL file: 4CubePrism3mm.stl, that is stored in my GitHub repository. From the browser, the GitHub image can be zoomed in or out and rotated. This allows you view the 3D object that is to be printed.
Load the STL file into your 3D printer's slicing program. A person who printed my sample, suggested rotating the object to have it stand on one point because it will require less supports when printed. Once the slicing file is created and exported, load it into the printer and print. The samples I had printed took about 2 and 1/2 hours.
Sample 3D wireframe shapes you can view in GitHub, download and print:
- Tesseract, 3mm cylinder frame: 4CubeCylinder3mm.stl
- Tesseract, 4mm cylinder frame: 4CubeCylinder4mm.stl
- Tesseract, 4mm square prism frame: 4CubePrism3mm.stl (my favorite)
- Tesseract, 5mm square prism frame: 4CubePrism5mm.stl
- Tesseract, 3mm cylinder frame with two center vertices: 4CubeUpCylinder3mm.stl
- Tesseract, 3mm square prism frame with two center vertices: 4CubeUpPrism3mm.stl (see attached)
- Schlegel tesseract, a different view of a tesseract, 3mm cylinder frame: 4CubeInCube3mm.stl, see attached at the top, it's the cube with a cube.
- Rhombic dodecahedron, 4mm square prism frame: dodecahedronPrism4mm.stl
- Rhombic dodecahedron, 3mm cylinder frame: dodecahedronCylinder3mm (see attached)
- Cube, 3mm cylinder frame: cubeCylinder3mm.stl
- Square, 3mm cylinder frame: squareCylinder3mm.stl
View the GitHub repository list: tigerfarm/tfpscience/CAD.
Please let me know your results, comments, and suggestions.
Basic Geometry
Since a tesseract is geometric shape and the rest of this instructable is about shapes, here is the basic geometric language.


Above is a point, line segment, square, cube(3-cube), tesseract(4-cube), and penteract(5-cube). The cube, 4-cube, and 5-cube have hidden lines drawn as dash lines. The concept of hidden lines is useful when working with CAD designs and complex shapes.
A polygon is a two-dimensional geometric shape formed by three or more straight line segments connected end-to-end. The line segments are called edges. Each point where the ends meet is called a vertex. Multiple vertex are called vertices.
A polyhedron is a three-dimensional solid figure with polygonal faces, straight edges, and sharp corner vertices.
If a polygon or polyhedron is regular, than it has equal length edges and equal angles. A square is a regular polygon. A cube is a regular polyhedron.
A polytope is a geometric object with flat sides, generalizing the concept of polygons and polyhedra to any number of dimensions (n-dimensions). A tesseract, or 4-cube, is a regular 4-polytope. A penteract, or 5-cube, is a regular 5-polytope.
A square prism is a cube that has four of its parallel edges evenly lengthened. It is made of two end squares and four rectangles.

A wireframe is the frame lines of a shape. The wireframe of a cube is the 12 edges of the cube which as 6 faces and 8 vertices.

In a CAD drawing, when the faces are opaque(not see through), the hidden lines maybe drawn as dash lines. This can help the viewer distinguish more details and get a better 3D perspective.
In a CAD drawing there is the option to view the design with the hidden lines removed.

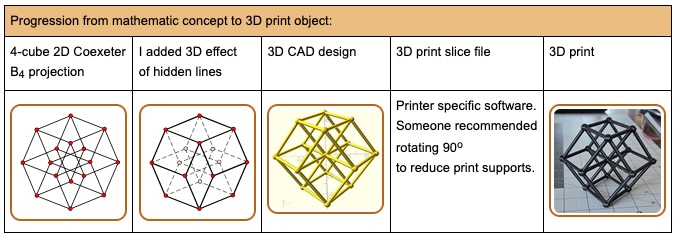
It is the same for a tesseract, a 4-cube that is projected into three dimensions. In the following, the first 4-cube is projected into two dimensions. The second is a 4-cube is projected into three dimensions with the hidden lines as dashed lines. The third is a 4-cube projected into three dimensions with the hidden lines removed.


Install Software to Create 3D Printable Files


For this and the following steps, the OpenSCAD software is required. OpenSCAD is an app that has a computer language to create CAD designs. Have confidence if you are not a programmer, you can still use OpenSCAD to modify sample programs. The output of OpenSCAD is a CAD designs and STL files for 3D printing. The designs are viewable for zooming and rotation.
Steps:
- Go to the OpenSCAD website and download and install the software.
- Once installed and running, click the "New" option to create a new design.
- Copy and paste the sample program: 4CubePrism3mm.scad, into your OpenSCAD app.
- Click the preview icon in the top menu (dotted cube with ">>"), or click F5, or select menu option Design/Preview. A preview of the design is display for you to zoom out/in and rotate (see attached screen print). It is a tesseract with a 4mm square prism frame.
Your OpenSCAD app is now tested and ready for development.
If you are a FreeCAD fan, FreeCAD has the ability to load an OpenSCAD program as an element. Steps: install OpenSCAD, install FreeCAD, start FreeCAD and create a new CAD design, select the OpenSCAD option, then copy and paste the sample program: 4CubePrism3mm.scad, into OpenSCAD area and click "Add" (see attached screen print). The design is displayed for viewing.
Modify a Sample Tesseract CAD Design


For this step, you will have already installed and tested OpenSCAD. It is an app for displaying and developing CAD designs using its programming language.
In this step, you will modify the tesseract's parameters to change:
- The overall size of the frame.
- The frame structs from square prism to cylinder.
- The vertex sphere shape and size.
Steps to prepare to modify a sample CAD design:
- Start the OpenSCAD app.
- Click the "New" option to create a new design.
- In the GitHub repository, view the sample OpenSCAD program file: 4CubePrism3mm.scad, which is a tesseract that has a 4mm square prism frame.
- Copy and paste the program into your OpenSCAD app.
- Click the preview icon in the top menu (dotted cube with ">>") to display the design. You can zoom out/in and rotate to explore the shape.
Following are straightforward changes that modify parameters to change the shape of the frame struts:
- In the OpenSCAD app, change line "rod_sides = 4;" to "rod_sides = 64;".
- Click the preview icon. Now, the frame struts are cylinders instead of square prisms.
"rod_sides" defines the number of edges(sides) used to make the cross-section of the frame. "4" makes square shaped structs. "6" makes hexagon shaped structs. "64" or "96" makes the struts smooth like a cylinder.
- In the OpenSCAD app, change line "edge_length = 50;" to "edge_length = 20;".
- Click the preview icon. Now, the frame shrinks. The vertex spheres stay the same size.
- Change line "vertexDiameter = 3;" to "vertexDiameter = 2;".
- Click the preview icon. Now, the vertex spheres are smaller.
- Change vertex diameter back "vertexDiameter = 2;" to "vertexDiameter = 3;".
- Click the preview icon. Now, the vertex spheres are larger, back to the origin size.
- Change line "vertexShape = 64;" to "vertexShape = 4;".
- Click the preview icon. Now, the vertex spheres are cubes.
Optionally, save the OpenSCAD file for future use.
To print the design changes:
- In the OpenSCAD app, click the Render icon in the top menu (cube with hourglass). The design view disappears while the rendering function runs. This can take a half minute or so. When the rendering function finishes, the design view reappears. On my computer, I also hear a chime. FreeCAD is much much faster at rendering.
- To export the design, select menu item: File/Export/Export as STL.
The STL file can be loaded into your 3D printer slicing program, prepped, and printed.
Development Background


My initial tesseract hypercube, 4-cube design began with my drawing on paper. I moved to using LibreOffice Draw to create designs. LibreOffice Draw is free to download and use. It's a graphics application that has the features required to draw polygons, polyhedra, and polytopes.
When writing my hidden line article on Wikipedia, I converted some of my diagrams into SVG files. SVG is an XML-based vector graphic format for defining two-dimensional graphics. It's a popular format for WikiMedia files that are used in Wikipedia.
Since I've wanted to 3D print a tesseract, a work colleague friend recommended FreeCAD. However, FreeCAD requires a serious effort to learn. I just wanted to print a couple 4-cube. A young bartender recommended ChatGPT to generate CAD files for printing. Even though he wasn't technical, his description was detailed enough for me to use ChatGPT to find OpenSCAD. I prompted ChatGPT to generate my first OpenSCAD program. The program had errors, but I'm a programmer and easily got it to generate a CAD design in FreeCAD.
Looking at M.C. Escher's Study for Stars, I liked how he had used square prism frames. To change my 4-cube design from a cylinder frame to a square prism frame, I gave my OpenSCAD program to Google Gemini and Gemini modified the code. I had a square prism frame 4-cube which is used in this instructable.
I analyzed M.C. Escher's Study for Stars and posted on Wikipedia descriptions of each of the shapes(attached to this step). To make one of the shapes Escher had etched, the Rhombic dodecahedron, I modified my 4-cube design by removing the inside struts, which made a Rhombic dodecahedron wireframe: OpenSCAD program and STL file.
General design tips:
- Start, by finding or creating a geometric shape.
- Optional, draw the shape on paper or in a drawing application.
- Develop an OpenSCAD program from a sample. Optionally, use ChatGPT, Google Gemini, or another AI agent to develop the program.
Quick Guide
Quick guide:
- STL files can be 3D printed. Load them into your printer's slicing program for preparation. Then, print the slicing program file.
- STL files can be exported from CAD applications.
- OpenSCAD is a CAD application that is used to develop CAD designs using its programming language.
- FreeCAD can load and use OpenSCAD programs to generate CAD elements.
- CAD applications are used to develop and view geometric shapes.
Shapes can even be discovered. The famous astronomer Johannes Kepler--who formulated the three laws of planetary motion which was used by Isaac Newton when developing his theory of gravitaty--is credited with the discovery of the rhombic dodecahedron in the early 1600s
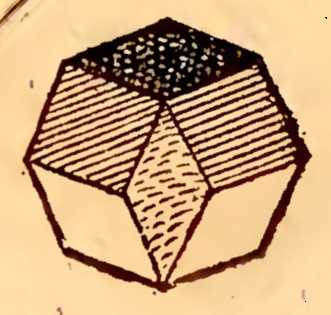 His published drawing from his 1619 book: Harmonice Mundi.
I created all of CAD designs, and all but one of the graphics in this instructable. This was my enjoyment and amusement. I hope this instructable encourages you design and print your own tesseract.
Play is the root of creativity and discovery.
Cheers,
Stacy David